Sunday, June 24, 2012

B-I-N-G-O!!

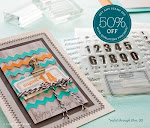
I've been playing with my new stamp sets, and I had to share!  The Bingo Alphabet (D1498) set is so cute!  I love the distressed alphabet font, which is the reason I ordered it.  The lettering fits beautifully inside a 1" punch, like on these magnets for my new Menu Board:   


I couldn't resist trying out a Bingo card while I was playing, and this is what I came up with:


How cute are these card fronts?  I love tucking a little note inside the kids' lunches, and these are just too much fun!  The lettering combinations are endless - Happy Birthday, Have a great day, thinking of you....endless!  And so easy to do with the clear My Acrylix stamps and blocks.  It's wonderful to see exactly where you're placing the letters.  Stamp with Confidence!!

This set comes with a plain grid for the bingo card, all of the letters of the alphabet, a full set of numbers and some small shapes to fit inside the grid blocks - a heart, a star, a circle and a flower - at least I think it's a flower!  It's cute!  It also comes with the swirly accent at the bottom of the grid.  You can use the lettering, the shapes and the grid on separate projects, or you can combine them as I've done for these cards.  Imagine the possibilities!  Such a great value when you consider what you can do with this one set. 


Through the end of June, for every 2 sets of My Acrylix stamps that you order, you can get another set of equal or lesser value FOR FREE!  You get to choose which sets you want!  Go to www.deequarles.ctmh.com to order and have everything delivered to your door.  How easy is that??

Okay, I'm going to go finish my Menu Board and then figure out what's for dinner....hahaha. 


Wednesday, June 13, 2012

June Beachy Layout Workshop

Sand, sun, surf....I love North Carolina, I really do!  I have tons of photos from the beaches here, and also waterparks, lakes, pools and kids' water play.  I was so thrilled to see the Footloose Paper Pack!  I just love the sunny yellows (creme brulee) and the deep ocean blue (lagoon). 
This month, we'll work on a fun Layout that you can customize.  I really like layouts that use 4x6 photos, since I don't need to crop my photos I can save time.  So, there's only one photo that's been cropped to 3 1/2 by 5.  You can always make the background shape a little taller to accommodate a 4x6 photo, though.

I really LOVE how this layout came out!  I've found 3 sets of photos to use with it, so I'll have to make a few more of these!  Fortunately, the whole thing takes just 4 1/2 sheets of cardstock, some twine and 4 of the Milepost stars.  You could certainly just use Cricut sealife shapes with it, or even use the Footloose Complements for a different look.  You can also turn the right side layout 90 degrees to accommodate 2 horizontal and one vertical photo as well.


I used 2 sheets of White Daisy for the backgrounds, and a single sheet of B&T for the patterned pieces.  I love the sun on the Footloose B&T paper, so I cut it out at 7" across and 8" down.  That left me with a piece for the right-side of the layout, which I trimmed 1/2" off lengthwise.  I then cut 3/4" off the bottom to make the photo mat on the right side.  I used that 3/4" to fill in above the piece on the left side to make a photo mat for the horizontal pic.

I cut one 12x12 piece of Lagoon cardstock to 6 1/2 by 11 1/4 for the other mat piece on the right.

The star and hemp twine embellishment is cut from a piece of Creme Brulee cardstock.  I used only 1/2 sheet of 8 1/2 by 11 Creme Brulee cardstock.  Cut the 8 1/2 by 11 in half, leaving 2 pieces of 4 1/4" by 11.  Cut this into 3 pieces - 1 1/2", 3" and 4".  (You'll have a scrap leftover).

For the Lagoon AP shape on the left, I used the Card shape on p. 58 cut at 6 1/4".  I used my Gypsy to remove the score marks, but you could do this in Cricut Craft Room as well.  You could also just cut it on your Cricut and ignore the marks. 

No Cricut?  Cut this mat at 4 1/4" by 6 1/4". 

There's a few ways to play with this one - here, I've used the Digital photo prints from Snapfish (theyr'e 4" by 5.3").  I changed the embellishment from stars to using a piece of the Zipstrip.  Not perfect, it needs to have the photos cropped, and it needs another piece of Creme Brulee on the right side between the photo and the journaling block.  It shows the versatility of this layout:

The cute girl in this photo is my lovely daughter.  These were taken at Great Wolf Lodge in Charlotte during our end of year Girl Scout trip.  Those girls had a BALL!

The title will be cut at the workshop, and will be done in Lagoon, then arranged over the Sun on the left side.  The Journaling block could also be changed to showcase a small photo.  Lots of possibilities with this layout!

Have fun - and don't forget the sunscreen!!

Monday, June 11, 2012

Christmas In JULY!!!

Feelin' the HEAT?  When we moved to NC 7 years ago, we left New England in the middle of a blizzard at the beginning of December.  We arrived 3 days later in balmy North Carolina to temperatures in the 70's.  Wow.  We knew we were HOME.  No more snow to shovel, no more ice to chip off the sidewalks and steps.  Yay!!

But it does get hot in the middle of summer, doesn't it?  To take our minds off the heat, let's have Christmas in July!  Well, we can prepare for Christmas, anyway! 
D1449 - Father Christmas -Set of 6
Get started on your Christmas crafting early this year!   The Fall 2011 Idea Book has lots of great seasonal stamps to help you get your Christmas crafting finished before the rush of the holidays hits. Wouldn't it be great to have your holiday cards finished before you're finishing off the turkey on Thanksgiving??

Take a peek at the Fall 2011 Idea Book and place your order online.  Get those sets that you can't live without for your holiday crafting, and take advantage of our Stampaganza Savings!!  Buy 2 Get 1 FREE!!! 

Santa will thank you when you still have time to make his favorite chocolate chip cookies because all of your Christmas crafting was done MONTHS AGO.  What are you waiting for??  Christmas??? 

Brilliant Idea for the Cricut Stamp Sets!

I'm sure someone else thought of this first, but I haven't seen it shared, so it might just be common sense!  I figured I'd pass this tip along for the quick and crafty types!

I was cutting out some cards on my Cricut, and I thought it was just such a waste of space to have the rest of the paper go in the trash or a scrap pile - so I put as many of the shapes for one of my stamp sets onto the mat to fill in the spaces as I could.  I have a Gypsy, but you could use Cricut Craft Room as well, or even just punch in shapes after you've cut out your main pieces until the paper runs out. 

I had to cut out a lot of card bases and tags, so I just filled in the remainder with various stamp set shapes. I cut some in Col white and some in White daisy.  You could also just sit down and cut shapes to match the stamp sets so they're ready to go. I like easy and quick!!


Then I popped the extra pieces into the envelope with the stamp set - TA DA.  Next time I need a quickly stamped flower or a shape for a sentiment, I've got it.  No messing with finding the right size, placing paper on the mat - it's done.


Saturday, June 9, 2012

Get 'em before they're GONE!!

Every 6 months, Close to My Heart releases a new Idea Book, chock full of great products; some are old and some are new.  To make way for the NEW products, some of the OLD products have to retire to that great craft room in the sky.  Many of the stamps and products from the Fall 2011 Idea Book will not be returning in the new Idea Book.  These products will only be available through July. 
I'm excited to see what Close to My Heart's artists have created for us!  But I'm sad to see some of my favorites go away.  Although I have no idea what will be coming in the new book, I'm certain that we won't be seeing these products:

Exclusive Inks markers - these are being phased out
Cardstock Shade Packs - the 8 1/2 by 11 sizes are being retired
How-To Books - Jeanette Lynton's fabulous How To series!  These have been discontinued, only Magic and Imagine are available in limited quantities (less than 200 books left of each!)
Paper Packs and Accessories which won't be carried forward are:
Cruisin'
Superhero
Footloose
Lucy
Typeset
Roxie
Elemental
Sonoma

If you've had your eye on something from the Fall/Winter 2011 Idea Book, the time buy it is NOW. 
Combine sets from the Fall 2011 Idea Book with sets from the Spring/Summer Idea Book during Stampaganza for some fabulous savings!

Order online through my Online site at www.deequarles.ctmh.com and get fast shipping right to your door!  Be sure to check out the "While Supplies Last" section for some great deals!!


Friday, June 8, 2012

My Acrylix - What are they??

I love stamping.  I've been using stamps to make cards and crafts since the 1990's.  Ha.  I still have some cute little teddy bears holding hearts and smiling.  See?   


I've tried almost every kind and brand of stamp out there at one point or another.  I had kind of given up on stamping, and figured I just wasn't any good at it because I'm such a perfectionist!  I couldn't get my messages straight and centered, so I'd toss out card after card; or worse, I wouldn't even start because I knew I'd mess it up!

Or, I'd find the perfect paper, the perfect stamp, and then I couldn't find ink to go with it!  I'd throw my hands up in despair and shove the paper and stamps into a drawer never to be seen again.

Not anymore!!!

Close to My Heart My Acrylix are the best stamps that I've ever used. 

Why? 

**  They take ink beautifully. No blotching, smearing or pooling.   

**  They print a perfect impression every time - EXACTLY where you want it!  You can see through the block AND the stamp to precisely line up your stamped image !

**  They're ready to use, right out of the convenient storage packet.  No cutting, stickers or messy mounting required.  Just remove from the plastic carrier sheet and place on your clear block.

**  Easy to store.  The storage envelopes protect your stamps, preventing them from becoming lost, and make an easy way for you to clearly see what stamps are in each packet.

**  The images are current and on-trend.  There's no fluffy little teddy bears here!  Just versatile and relevant images and sentiments that you can use to create dozens of beautiful cards, layouts and projects. 

Sunday, June 3, 2012

Stella Card Workshop

Some of the girls came over to play today - we made CARDS!  Fun Folds Galore! Each of these cards fits into a standard card-sized envelope (A2) and they're so pretty!


Paper is from the Stella Paper Pack, and we used Cocoa, Olive, Sunset, Tulip and Lagoon Exclusive Inks.


Here's what the inside of the cards looks like:


Card #1 - Finished Size: 4 1/4 by 5 1/2
For the Tree card, we used "A Tree" My Acrylix stamp set (A1124 - $6.95).  Love this set!  I thought this set would be perfect for the Emboss Resist technique.  We embossed the leafy part of the tree with Versamark Ink (Z891) and used Clear Detail Embossing powerder (Z821) over it.  Then we rubbed Olive ink over the embossed image using 1/6 of a Sponge (Z697).  We cut out the leafy part and then inked the edges with Cocoa. 

We stamped the whole Tree image onto a 3 1/2" square piece of  Colonial White cardstock, then popped the leafy part over the cocoa image with 3-D tape.  The piece of Stella paper at the bottom of the card is 1 3/4" by 5 1/4".  We used the Zip strip from the Stella paper for a contrasting paper, cut at 5 1/4".  The little butterfly was stamped and then cut out and popped up next to the tree.  The base of the card is a Colonial White standard card base (X1410). 


Card #2 - Finished Size:  4 1/4" by 4 1/4"
The Square 4-way fold card was made using a piece of 8" square Colonial White paper.
Score the piece at 2" and 6", then turn 1/4 turn and score at 2" and 6" again. 
Using scissors, cut out each of the 4 corners, leaving a card that's 4" square in the center with 4 "wings."
Stamp the flower from Card Word Puzzle (C1494) on the top and bottom wing using Lagoon ink.
Stamp the sentiment and two butterflies in Tulip.
Cut 6 pieces of B&T paper to cover the wings at 3 7/8 by 1 7/8.  Ink the edges.  Adhere one on each side of your sentiment (left and right wings) and then flip the card base over and adhere one to each wing on the "outside" of your card.

On a scrap piece (from the pieces you cut out of the corners) of Colonial White, stamp the smaller flower from this set in Lagoon.  Cut out the flower using scissors, then ink the edge with Cocoa. Ink a 1 1/2" piece of Seam Binding Ribbon with Sweet Leaf ink.  Use your heat gun to dry the ribbon, then fold in half to make "leaves" for the flower.  Adhere with Liquid Glass onto the upper left square.

Cut a piece of B&T paper at 4 1/4 by 4 1/4.  This will be the backing piece for your box fold card.  Close the card like a box and adhere to the backing piece, making sure to center it.
Put two Durables studs (Z1705) on the lower right corner to finish it up.  

Card #3 -  Finished Size:  5 1/2" by 4"

Double Gate Fold Card - Make a base from Colonial White cut at 5 1/2" by 12".
Score at 2, 4, 8 and 10.

Stamp sentiment inside card, fold sides inward and then back on themselves to create the double gatefold. 

Apply a piece of B&T paper cut at 5 1/4" by 1 3/4" to each side of the card front when folded. 

Using Just for You (B1398 $9.95) stamp the large flower outline in Cocoa onto Colonial White cardstock cut into a coordinating flower on the Cricut. (If you don't have the Art Philosophy cartridge, you can cut this by hand, of course!)  Stamp the petals with Goldrush, Lagoon and Olive. 

Apply the flower to a square of Cocoa cardstock cut at 2 3/4".  Use 3-D foam tape to adhere the flower, and then apply the foam tape to one half of the square.  Apply the square to the card front with the card closed, making sure to only put adhesive on one side of the center fold. 

**We had a great time!  We also made a quickie Matchbook Teabag Favor.  I'll take some photos and post the directions later!**

Friday, June 1, 2012

STAMPAGANZA is here - and updated SPECIALS!


Get a great deal when you buy Close to My Heart clear My Acrylix stamps during the month of June! You can purchase any 2 stamp sets from our current catalog or the Fall/Winter catalog AND - get ONE FOR FREE! (Excluding bundled workshop stamp sets, AP bundled stamp sets and the stamp of the month) That means, if you purchase 2 sets of stamps at $13.95 each, you'll get one set at $13.95 for FREE - that's 33% OFF!! Isn't that fabulous??

Place your order online with me at www.deequarles.ctmh.com (secure payment and shipping straight to your door!) starting at 9am June 1 to take advantage of this great deal. If you plan to order $150 or more, contact me now to find out how to get $25 in FREE products!

PLUS, I'm honoring a 10% savings on the Cricut Art Philosophy cartridge during the month of June if you place your order by phone or email only - combine your AP cartridge purchase with STAMPAGANZA and really save!!

Art Philosophy - normally $99 - until June 30 with me just $89
3 D-size stamp sets at $17.95 each - normally $53.85, now just $35.90
3 B-size stamp sets at $9.95 each - normally $29.85, now just $19.90


AND - your total for the above order would qualify you for an ADDITIONAL $25 in Close to My Heart products!  You'll save almost $40 on your purchase as well! (Please note - you must contact me for this special pricing, orders placed online through my CTMH website do not qualify for this additional promotion. Prices above do not include s/h or sales tax.)

So - make your list now! I am happy to accept payment by Paypal or Postal Money order with prior arrangements.

Dee Quarles
www.inspired.scrapbooks.blogspot.com
www.deequarles.ctmh.com